
The challenges of capturing your Alaskan story
A line of folks leaned against the cruise ship railing, staring toward Harvard Glacier. An all-day blanket of fog and drizzle had dissolved; shafts of sun cast the glacier, the surrounding mountains, the water, even the air itself in magical, silver-tinged tones—the sort of scene that would stop anyone in their tracks. You could practically hear a whispered, collective wow hanging over the fjord.
Naturally, pretty much everyone in the crowd held cameras—mostly cell phones and compacts, with a few advanced amateur and pro-grade rigs mixed in. Some took careless-seeming, rapid-fire snapshots; others worked on selfies and group stuff with the glacier as a backdrop; a few studied the scene, composed careful images, then stood, lips pursed, staring into their screens, then tried again. And again. I didn’t have to peer over shoulders to know that the more serious photographers were struggling to condense that infinite vista into decidedly finite, rectangular images. I knew their pain all too well.
Thirty years ago, I stood on a high bank in arctic Alaska, gazing out over a different yet similar landscape—one so beautiful it hurt: a rolling sweep of autumn tundra blazing red and gold, and beyond, the cloud-wreathed, ragged peaks of the Schwatka Mountains brushed with early snow. I unslung my camera pack, set up my brand-new tripod, dug out my shiny Nikon and went to work. Over the next half hour, I burned through frame after frame—in all, close to two rolls of Fuji Velvia ISO 50 slide film (the gold standard back in those days); and finally headed back to my jet skiff, feeling pretty smug and professional.
Two weeks later I sat squinting into my loupe, muttering to myself as I tossed one slide after another into the burn box. There was nothing really wrong with most of them, but nothing great, either. And many were practically the same. I kept the best half-dozen as consolation, knowing damn well that none of them would ever end up getting so much as shown to an editor, let alone used. The scene I’d hoped to capture, bursting with so much promise, had somehow eluded me. The truth hurt: I neither knew how to compose nor to manage the mechanical end of things, like depth of field and exposure compensation. Fancy new gear meant nothing in ignorant hands.
That was when I was just beginning to take photography seriously and struggling to make the upward climb into actually getting paid (at least now and then) to take pictures. I’d published a half-dozen magazine pieces—including my first two features in Alaska magazine—along with a handful of accompanying images, of which I was immensely proud.
But as I made more submissions, photo editors glanced through the glassine slide sleeves I sent them and shook their heads. Better you should stick to writing, a German editor for GEO (their equivalent of National Geographic) gravely advised me. And though my pitch to Alaska magazine of a monthly column titled On The Edge was accepted in 1992, for the first couple years it was illustrated by paintings from an outdoors artist who’d never been to Alaska.
What about my own pictures? I asked. My photography just wasn’t good enough, I was told again. With a few exceptions, I could see their point. Most of my best were just okay, and it went down from there. It was time to up my game or take that German’s advice.
Learning to become a solid photographer is more craft than art; even learning the ropes with 90s-era film cameras (far less user-friendly than the latest auto-everything digital gear, with the incredible bonus of instant feedback and no-cost experimentation) is closer to basic carpentry than learning the violin.
Get the best tools you want to afford; read up and learn how to use them; follow some basic rules and sharpen your understanding of what’s good and what’s not; get in some serious practice and seek out honest evaluation, especially from yourself as you train your eyes, hands, and brain; keep at it, and pretty much anyone can step up their game from dweeb level to at least competent.
I set out down that trail and got lucky. Top pros passed through Ambler in those golden days of Alaskan nature photography, attracted by the same country that had held me here, and they lacked the necessary boats, snowmachines, and local knowledge I had. Of course, I was thrilled to trade trips for what amounted to lessons. Getting to watch guys like Tom Walker and Michio Hoshino work, peering through their viewfinders and getting tips on equipment and technique, witnessing and trying to emulate their professional intensity, supercharged my progress. I was still—as I remain—a writer who took pictures; but those pictures definitely got better, and editors noticed. I started selling shots, not only in support of my own writing (including this column) but for other folks’ material; plus ad sales, prints, and hey, even a calendar shot, magazine, or book cover now and then.

My point here isn’t to bask. It’s to say that if I could pull it off, you, too, can become a much better photographer than you are now. And it’s cool to have better instead of blah pictures to show others; and perhaps more importantly, to yourself. Pictures are, after all, what journals once were: the stories of our lives. So, it follows—better pictures, better story, right?
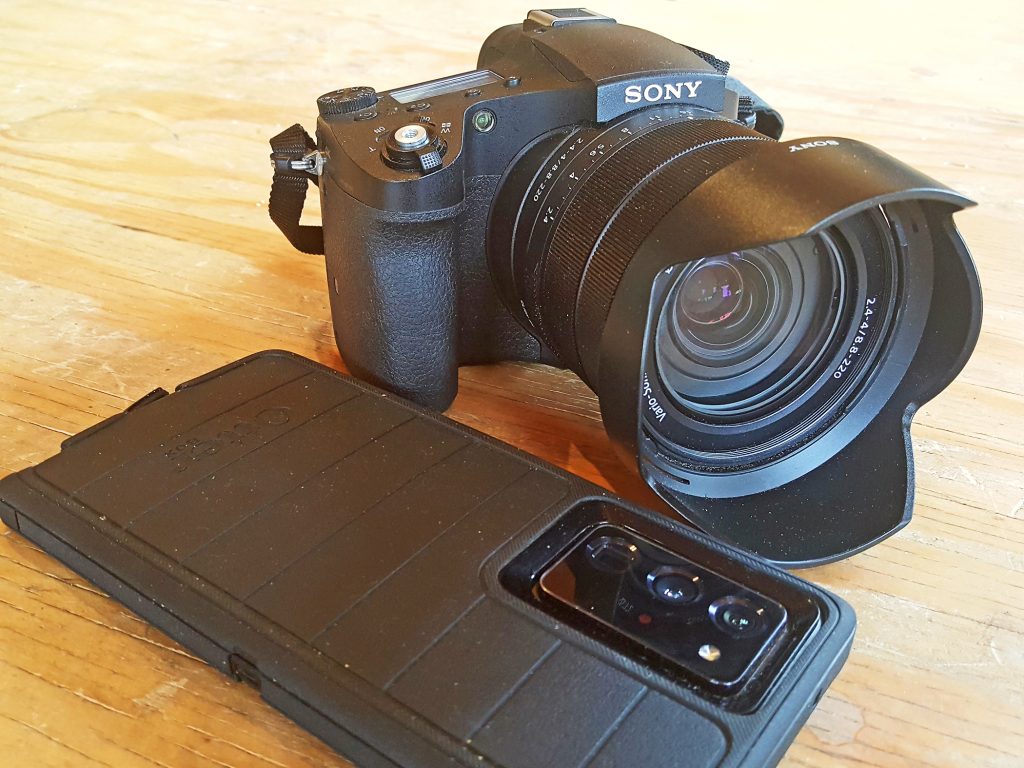
Can’t afford or don’t want to be tethered to full-size professional gear? No worries. Over the past decade I’ve been steadily downsizing my own kit, and the past two Alaskan seasons, left my pack full of big bodies, lenses, tripod, and accessories, though pared to a comparatively svelte 30 pounds, back in Florida. Yet I’m shooting more than ever and enjoying it more. My tools? A high-end triple-lens, large-screen cell phone (chosen for its picture quality, period) and a top-grade “bridge” camera—that is, a semi-compact rig with an attached, wide-range zoom lens that spans the gulf between pro gear and ordinary compacts.
Though of course I’m trading away capabilities, the results are good enough that I rarely miss what I no longer carry—especially those 27 additional pounds. I use the cell for wide angle landscapes, people, detail shots and close-ups, indoors and out; and the bridge camera, coupled with a monopod, gives me the extra telephoto oomph, focus speed, and pixel count that’s a must for high-resolution landscape, wildlife, and action images.
Here are some general principles to keep in mind. Unless it’s a reaction shot, like a breaching whale, take some time to study the scene. Try to figure out what’s attracting your eye and how to capture its essence. Then look for some sort of subject or focal point—a silhouetted human figure, a winding trail, even a ship railing to guide you into the image, and try to avoid placing it dead center.
Especially with landscapes, I’m always on the lookout for diagonals or curves that offer a sense of perspective. Interesting clouds, reflections in water, or dramatic light are always a plus. Be aware of the entire image, corner to corner, and manage negative space—the stuff that isn’t the subject. Then decide what magnification and image ratio to use. If there’s any lesson I gleaned from watching real pros at work, it’s pay attention to every detail and make (not take) your images with great care. Shoot freely but avoid repeating the same shot over and over. Experiment with different angles and compositions; go high and low; study your screen and learn. Larger-than-life scenes, like that one at the Harvard Glacier, sometimes don’t translate into a mere picture. Just relax and be present in that moment of your story.
Comments are closed.